
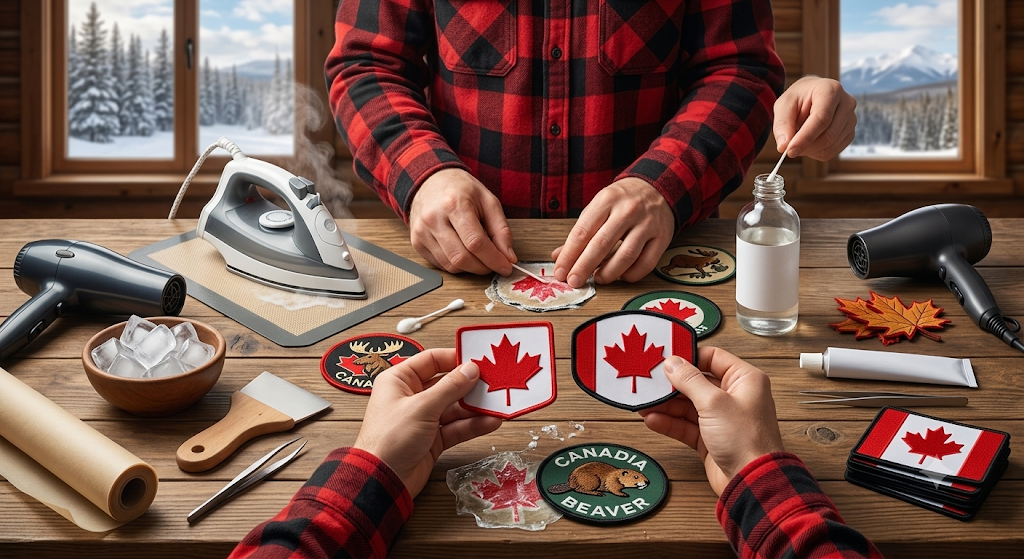
You finally decided to remove that old patch from your jacket, and now you have a stubborn ring of yellowish glue staring back at you. Whether it is leftover adhesive from an iron-on patch, heat-seal backing, or a peel-and-stick emblem, sticky residue on fabric is one of the most frustrating patch problems Canadians deal with.
This guide walks you through exactly how to remove glue from patches, how to clean adhesive residue off different fabric types, what household products actually work, and what you should never do. By the end, you will know which method suits your garment, your patch type, and the tools you already have at home.
Why Patch Glue Leaves Residue
Understanding the glue is the first step to removing it cleanly. Most patch adhesives fall into one of three categories:
| Adhesive Type | Common Source | Removal Difficulty |
| Heat-activated (iron-on) | Iron-on embroidered or woven patches | Moderate |
| Pressure-sensitive (peel-and-stick) | Temporary decorative patches | Easy to Moderate |
| Hot glue or craft adhesive | DIY patch application | Moderate to Hard |
| Industrial textile bonding adhesive | Factory-applied patches on uniforms | Hard |
Heat-activated glue (used in iron-on patches) is the most common type Canadians encounter. When you apply heat to bond the patch, the thermoplastic adhesive melts into the fabric fibres. When you remove the patch, those fibres cling to leftover adhesive, which hardens and forms the sticky halo effect you see.
If you applied patches with iron-on backing, our full guide on iron-on custom patches in Canada explains exactly how heat-seal adhesives work and which fabrics bond best, which also helps you predict how the glue will behave during removal.
What You Need Before You Start
Gather these supplies before attempting removal to avoid stopping mid-process, which can spread the adhesive further:
- Rubbing alcohol (isopropyl alcohol 70% or higher)
- White vinegar
- Acetone-free nail polish remover
- Commercial adhesive remover (Goo Gone, Un-Du, or Motsenbocker’s Lift Off)
- Clean white cloths or cotton balls
- Plastic scraper or old credit card
- Laundry pre-treater or dish soap
- A clothes iron and pressing cloth (for the heat-reactivation method)
Always test your chosen remover on a hidden seam or hem allowance first, especially on coloured or delicate fabrics. What works on denim can bleed dye on polyester.
How to Remove Iron-On Patch Glue from Fabric: Step by Step
This is the most searched method in Canada, and for good reason. Iron-on patch adhesive is everywhere, from scout badges to motorcycle vests to team uniforms.
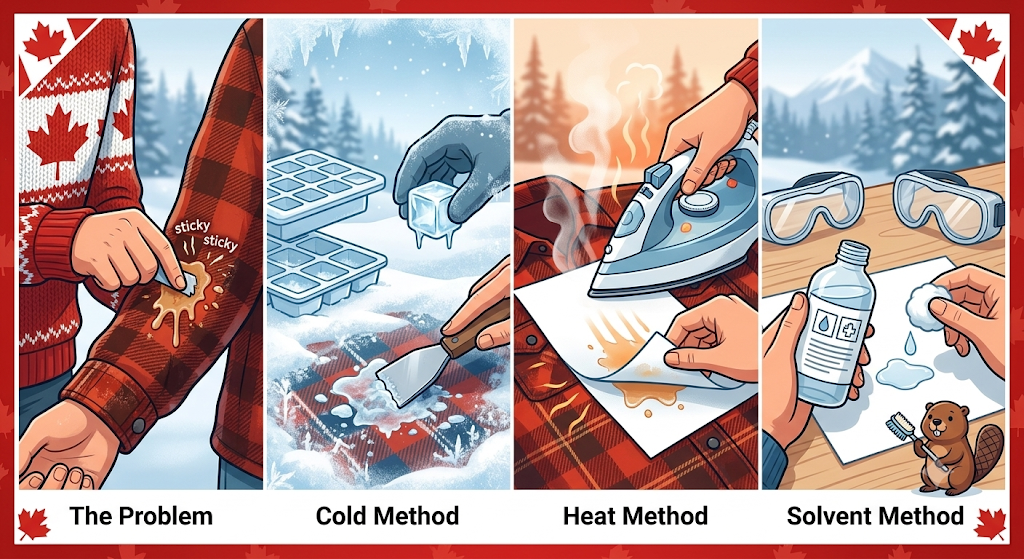
Method 1 – Heat Reactivation (Best First Step)
Before reaching for any chemical, try heat first. Most iron-on glue will soften enough to be cleanly lifted if you reactivate it carefully:
- Set your iron to medium heat (do not use steam).
- Place a clean pressing cloth over the glue residue.
- Press the iron over the cloth for 10 to 15 seconds.
- While the fabric is still warm, use a plastic scraper or your fingernail to gently lift the softened adhesive.
- Repeat until most of the residue is physically lifted off.
- Follow with a solvent cleaner for any remaining film.
Method 2 – Rubbing Alcohol (Best for Cotton and Denim)
Isopropyl alcohol breaks down the polymer chains in most iron-on adhesives without damaging cotton or denim. Apply a small amount to a clean cloth, press it onto the glue residue, and let it sit for two minutes. Then rub in a circular motion to lift the adhesive. Repeat as needed and rinse with cold water before washing normally.
Method 3 – White Vinegar (Gentle, Fabric-Safe)
Warm white vinegar works particularly well on lighter-coloured fabrics and blends. Soak a cloth in white vinegar heated to just above room temperature, then press it against the residue for five minutes. The acetic acid slowly dissolves adhesive bonds without the aggressive action of alcohol. This is the recommended starting point for wool blends, polar fleece, and school uniform fabric.
Method 4 – Commercial Adhesive Remover (Fastest for Stubborn Residue)
Products like Goo Gone or Motsenbocker’s Lift Off are widely available at Canadian Tire, Home Hardware, and online. Apply a few drops directly to the residue, let it penetrate for five minutes, then wipe with a clean cloth. Always follow with a thorough soap-and-water wash before wearing the garment, as these products can leave an oily film.
Removing Glue from Specific Fabric Types
The fabric matters as much as the adhesive type. Using the wrong solvent on the wrong fabric can cause permanent discolouration or fibre damage.
| Fabric | Recommended Method | Avoid |
| Cotton / Denim | Rubbing alcohol, heat reactivation, Goo Gone | Acetone (can fade colour) |
| Polyester / Nylon | White vinegar, mild adhesive remover | High heat, acetone, harsh solvents |
| Leather / Faux Leather | Rubbing alcohol on a cotton swab, peel slowly | Vinegar (can dry and crack leather) |
| Wool Blend | Warm white vinegar, gentle scraping | High heat, alcohol (can feel the fibres) |
| Canvas / Tactical Gear | Commercial adhesive remover, heat reactivation | Nothing to avoid specifically; test first |
| Athletic / Moisture-Wick Fabric | Mild soap and warm water, gentle peel | Acetone, harsh solvents (destroy stretch fibres) |
Uniform fabrics in Canada, used across police, military, sports, and corporate contexts, often have specific care requirements. If you are working with custom uniform patches on regulated workwear, always consult your uniform supplier before attempting any adhesive removal, as improper cleaning can void a garment warranty or violate dress code standards.
How to Remove Glue from Embroidered Patches Specifically
Embroidered patches have a tighter weave than woven patches and hold adhesive residue differently. Because the embroidery thread sits above the fabric surface, glue tends to accumulate along the patch border and the merrow edge rather than beneath the entire patch.
The heat reactivation method works extremely well here. Apply the iron to the residue area at the patch border, scrape gently with a plastic tool, then clean with a cloth dampened with rubbing alcohol. Take care not to apply alcohol directly to embroidery thread of unknown quality, as cheaper threads can bleed colour.
Removing PVC and Velcro Patch Adhesive
PVC patches and Velcro-backed patches have different adhesive profiles than embroidered ones. PVC patches sometimes come with a pressure-sensitive adhesive layer for temporary positioning, which is usually easy to peel. The challenge arises with Velcro loop fabric left behind on a jacket after the patch is removed.
To remove Velcro patch residue, carefully unpick any remaining loop fabric, then treat the underlying glue with rubbing alcohol. If the original application involved iron-on Velcro rather than sewn-on Velcro, use the heat method to loosen the adhesive backing before peeling. For more on backing types and which are easiest to remove cleanly, the patch backing comparison guide is a useful reference.
Canadian outdoors enthusiasts who use Velcro patches for backpacks often deal with this issue when rotating patches between packs. The good news is that nylon backpack fabric responds well to the warm vinegar method for residue removal, and the hook side of Velcro rarely leaves glue since it is typically sewn, not ironed.
Common Mistakes When Removing Patch Glue
Most fabric damage during patch removal happens not from the adhesive itself but from using the wrong removal technique. These are the mistakes to avoid:
- Using acetone or nail polish remover on polyester or synthetic fabric: acetone melts synthetic fibres and can cause permanent holes or distortion.
- Scrubbing aggressively while the glue is still cold and hard: this embeds the adhesive deeper and causes pilling.
- Applying too much heat without a pressing cloth: direct iron contact can scorch fabric or make the adhesive bond even more deeply.
- Soaking the entire garment in solvent: adhesive removers are meant to be used in small, targeted applications.
- Skipping the post-treatment wash: residue from chemical removers must be fully washed out, or it attracts lint and causes skin irritation.
When to Call It Done and Replace the Patch Instead
Sometimes a patch leaves a permanent mark, or the fabric was already thin before removal. If you have tried two or three methods and still have visible residue staining, it is often more practical to cover the area with a new patch rather than continue damaging the fabric.
A custom embroidered patch, sized slightly larger than the stained area, can cover the blemish completely while refreshing the look of the garment. This approach is especially popular for motorcycle jackets, team vests, and denim, where patches are a core part of the garment’s identity anyway.
If the garment you are working with belongs to a team or club, it may be worth ordering fresh custom patches in Canada with a Velcro backing rather than iron-on to make future changes much easier and mess-free.
Preventing Glue Residue in the First Place
The best approach to patch glue residue is preventing it at the point of application. These habits significantly reduce adhesive bleed and make future removal far cleaner:
- Always place a pressing cloth between the iron and the patch during application to prevent adhesive overflow onto surrounding fabric.
- Use the correct temperature for the fabric type. Too much heat causes adhesive to seep beyond the patch border.
- Choose sew-on patches for garments you know will need maintenance or regular washing.
- If using iron-on patches on gear you want to rotate, consider having the patches backed with Velcro so they peel without adhesive contact.
- Store unused iron-on patches away from heat sources to prevent the adhesive backing from activating prematurely.
For patches you plan to wear long-term, learning how to prevent custom patches from falling off ensures you apply them correctly the first time and reduce the chances of needing aggressive removal later.
And once your patches are properly applied, this embroidered patch care guide will help you wash and maintain them so they last longer without peeling or bleeding adhesive.
Frequently Asked Questions
Does rubbing alcohol remove iron-on patch glue?
Yes. Isopropyl alcohol at 70% concentration or higher is one of the most effective and widely available household solutions for dissolving iron-on patch adhesive. Apply it to a clean cloth rather than directly to the fabric, press and hold for one to two minutes, then wipe in circular motions. It works best on cotton and denim and is safe for most natural fibres.
Can I use nail polish remover to remove patch glue?
Only if it is acetone-free, acetone-based nail polish remover will melt or warp synthetic fabrics such as polyester, nylon, and acrylic. If your garment is 100% cotton, a small amount of acetone-free remover applied carefully can work, but it is safer to use rubbing alcohol or a dedicated fabric adhesive remover instead.
How do you get heat-seal patch residue off a backpack?
For nylon backpacks, start with the warm white vinegar method. Soak a cloth in warmed white vinegar, press it against the residue for five minutes, then gently scrape with a plastic card. If residue remains, apply a small amount of adhesive remover such as Goo Gone and follow with a soap-and-water rinse. Avoid acetone or high-heat methods on nylon.
Will Goo Gone damage fabric?
Goo Gone is generally safe for most fabrics when used as directed, but it can leave an oily film that must be fully washed out. Always follow the application with a thorough wash using dish soap or laundry detergent. Test on a hidden section of the garment first, particularly with dark or bright-coloured fabrics, as it can occasionally lighten dyes on very sensitive materials.
Can you remove patch glue from leather?
Yes, but you need to be careful. Use rubbing alcohol applied to a cotton swab and work in small circular motions directly over the residue only. Avoid soaking the area. After removing the adhesive, apply a leather conditioner to restore moisture to the surface, as alcohol can dry out leather and cause cracking over time.
Is there a way to remove patches without leaving residue?
The cleanest removal method involves reactivating the iron-on adhesive with gentle heat and then lifting the patch before the glue rehardens. Using a pressing cloth, apply low-to-medium heat to the patch, then peel from one corner slowly while the fabric is still warm. Sew-on patches and Velcro-backed patches leave no glue residue at all when removed, which is why many Canadians prefer them for gear and uniforms where patches change regularly.
What removes patch adhesive from a hockey jersey?
Most Canadian hockey jerseys are made from polyester or performance mesh. Avoid acetone and high heat on these fabrics. Use a small amount of mild adhesive remover or warm white vinegar on a cloth, press gently against the residue, and wipe slowly. Rinse thoroughly with cold water afterwards and air dry. Never put a jersey with chemical remover still on it into a dryer.
Bring Your Garment Back to Life
Removing patch glue from fabric does not have to be a frustrating or risky process. The key is choosing the right removal method for your fabric type and adhesive. Whether you use heat reactivation, rubbing alcohol, white vinegar, or a commercial adhesive remover, a careful approach will help you eliminate residue without damaging your garment.
For the best results, always test products on a hidden area first, avoid harsh chemicals on delicate fabrics, and wash the item thoroughly after treatment. If residue remains or the fabric has been permanently marked, covering the area with a new patch can often be the simplest and most effective solution.
Whether you need bold embroidered patches or highly detailed woven patches, Eagle Patches Canada can help bring your design to life. Our team offers free design assistance, premium-quality materials, and custom solutions tailored to your exact requirements